
Auxiliary Movements
a) Double-lever action when crossing from one string to an adjacent one
(See the hand position in images 25 and 26 of the Appendix.)
First, perform the movement in the immediate vicinity of the frog, with just a little arm movement and plenty of the double-lever action. Also, make sure that there are as few gaps between the strokes as possible, and that the rhythmic execution is precise! Even the smallest note value should be rhythmical! There should be no unrhythmical exercise at all! It is essential that there is minimal participation of the upper arm in this movement.
Practice the same fundamental principles at the frog. Make sure to use an economical amount of bow—3-5 cm.— for this exercise. Keep an equality of tone and use equal amounts of bow for the up-bow and down-bow strokes, Maintain equality of sound and the equal amount of bow for the up-bow and down-bow, despite the fact that one covers three sixteenth notes and the other just one sixteenth note.
The rhythmic and dynamic precision you can get from playing with small amounts (and very small amounts) of bow has invaluable advantages, both for later virtuoso playing and for economy of bow usage.
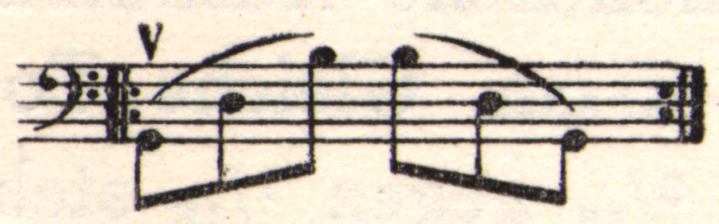
When studying the above exercises, ensure that the second eighth note (in the first exercise) or the second and third sixteenth notes (in the second exercise) are not shortened.
Put each individual eighth note under a sort of “auditory magnifying glass” where you divide it into sixteenth notes or thirty-second notes, and count through these smaller subdivisions.
In both bow directions, maintain an equal precision! Of course, with the restricted movement, an ideal sound cannot be achieved. However, with sufficient lightness of the fingers, the figure can be executed without unpleasant extraneous noises.
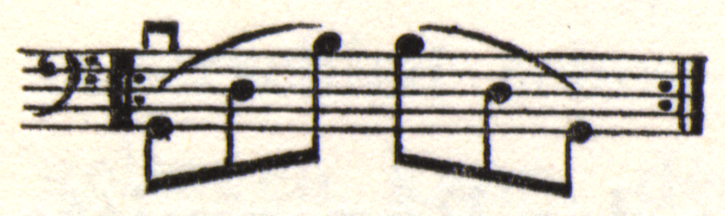
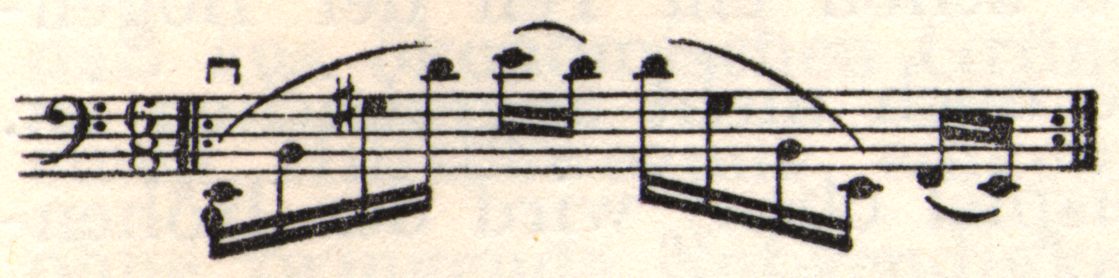
The following exercise across four strings requires extensive use of double-lever playing.
In the next figure, the lowered wrist must remain “reserved” during the up-bow (see the illustrations at the end of this chapter).
The notes played on the up-bow should not sound louder than the others.
However, since we must use the same amount of bow for two sixteenth notes as we do for four sixteenth notes, the up-bow stroke must be taken exceptionally lightly. This requires partially lifting the weight of the bow through supination pressure of the little finger. This can only be effective with completely free and flexible movement of the index finger, thumb, and little finger.
If the double-lever movement is not enough to reach all the strings (especially for players with smaller hands), some forearm rotation may be used. However, for reasons of economy, it is crucial to make sure that this only happens when the auxiliary movement is fully exhausted. Remember: never use the forearm unless it is absolutely necessary!
b) Bending and straightening the fingers for string crossings in the middle of the bow
As a second series of exercises, play the previous exercises in the middle of the bow.
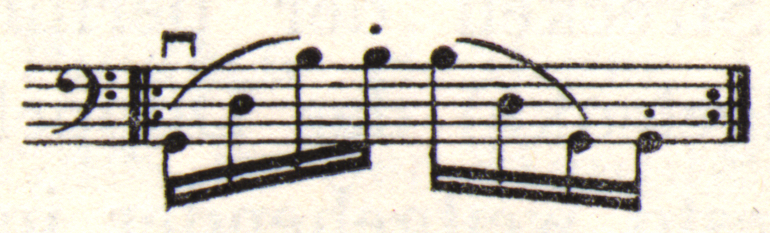
Here, the bending and straightening of the fingers (flexing the knuckle joints while extending the middle finger joints, then doing the reverse—extending the knuckles while flexing the middle joints) replaces the double-lever action at the frog. The more strings one has to cross, the more important this auxiliary movement becomes. In this figure, it is possible to cross strings by merely bending and straightening the fingers.
On the D-string, the fingers flex at the base joints and extend at the middle joints. The A-string is reached by extending the base joints and bending the end joints of the fingers (see images 27 and 28 of the Appendix).
For crossing over three strings, this compensatory movement is not always sufficient. In such cases, it becomes necessary to temporarily use wrist flexion and extension, or forearm rotation. However, postpone this as much as possible so that you can learn to flex and extend the fingers to their limits. The realm of possibility extends much further than it initially appears! … Through careful study of these precise movements, we make the later acquisition of advanced technique much easier for ourselves. This is because we have more means at our disposal than players who do everything with only the arm and wrist. Each time they execute this movement, they have to deal with the weight of bow itself, plus the inertia of the arm (i.e. its resistance to starting, stopping, and changing direction).
c) Combination of finger movement, wrist adjustment, and arm movement
We will now play the same or similar exercises at the very tip of the bow (over three strings). Cellists with reasonably long fingers will be able to mange these, and four-string ones, with pure finger movement. However, if we attempted these arpeggiated figures with stiff fingers, wrist flexion, and wrist extension, it would cause constant tilting of the bow stick. This would mean using a lot of hair on a C-string but only a little on the A-string, because the wrist would be high on the C-string and low on the A-string. This would severely impair the equality of the sound production.
But if you examine this process carefully, you can observe the following: When you use incorrect wrist movements for string crossings, the bow tilts at the wrong angle as soon as you start moving toward the adjacent string. This happens because the wrist moves up and down in a flowing motion that is connected to the bowing stroke, rather than moving in a more controlled way. As a result, some of the bow hairs lose contact with the lower string before the bow has fully reached the higher string.
When crossing four strings (see the first exercise above), the difference in elevation becomes so great that only very long-fingered and flexible hands can succeed in compensating for the difference in level between the various strings by finger movement alone. Due to the long lever (represented by the bow at the tip), the swing of the hand reaches its maximum limit.
To overcome the difference in level between the C- and A-strings when playing an arpeggiated chord over four strings in the upper third of the bow, we must add some arm activity to the function of the wrist and finger joints.
If the compensatory movement of the hand and fingers described above is done correctly, the arm movement is essentially limited to changing the angle of the upper arm and forearm at the elbow joint. (This is where the “rowing” movement, which is otherwise superfluous, becomes appropriate.)
In image 33 of the Appendix, the bow is on the C-string. The wrist is flexed, the fingers and thumb extended. Image 29 shows the string crossing from the C-string to the G-string. Image 30 shows the bow on the G-string. The wrist is less flexed, the fingers less extended; the angle of the elbow is slightly more opened to almost 90 degrees. Image 31 shows the bow on the D-string, with the back of the hand as almost a continuation of the forearm, the fingers bent, and the angle of the elbow slightly wider. Image 32 shows the bow on the A-string, with the back of the hand raised slightly above the horizontal, with the first, second, and third fingers pronouncedly bent and the fourth finger extended. The thumb is almost horizontal, and the angle of the elbow between 150 and 180 degrees depending on the length of the player’s arms.
Parallel to these mechanical progresses is the very important concept of longitudinal bow rotation. (This has already been described and illustrated in images 16, 17, and 18 of the Appendix.) During the bow’s longitudinal rotation, rotation of the thumb is the main criterion for relaxed bow control (see the instructions for string crossings).
This is necessary due to the relationship between our movement system and the instrument itself.
Since the longitudinal axis of the instrument is inclined towards the players body, and also because the strings are not completely parallel to each other from bridge to nut, our need to bow at a right angle to the strings can only be met by moving the frog towards the body when playing on the C-string, and away from the body when playing on the A-string.
The adjustment for different playing planes is primarily achieved with wrist and finger movements in combination with thumb rotation, with the natural addition of forearm movement.
Only then do we achieve proper bowing on every “plane” of the respective strings!
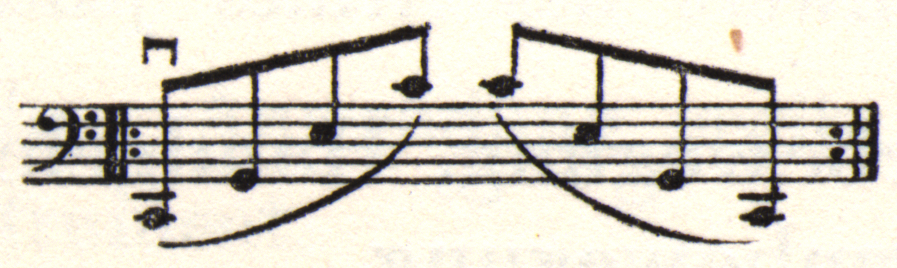
Using very little bow, let us now play this figure at the very tip of the bow:
Here, we must do our best to unite all of these partial movements into a whole, cohesive movement. The tonal results always depend on the strict execution of a unified sequence of movements.
The learner’s task is to synthesize all of these individual mechanical functions smoothly and without impediment, through thoughtful practice. Success essentially depends on how well the player follows the mechanical details outlined here. We must point out that no link in this chain of individual movements can be missing, so that the most important principle of this type of bowing—looseness—remains achievable even when we are applying maximal force and tackling the most difficult passages.
To get an idea of the movement needed to play the musical example above, study images 33, 34, and 35 of the Appendix in succession. The overall hand movement during the down-bow stroke goes forwards and diagonally outward, as if moving away from the body. The movement combines flexion of the wrist, extreme straightening of the end joints of the fingers, further forearm supination on the C-string, plus adjustments when crossing over the middle strings to the eventual position of the hand on the D- and D-strings. Here, the hand is slightly bent upward. The base joints of the fingers are extended, the end joints bent, and the forearm moderately pronated.
During the course of this movement, the angle between the forearm and upper arm (which is less than a right angle when playing on the C-string), becomes increasingly more obtuse, so that by the time we are on the A-string, the forearm and upper arm form an angle of approximately 160 degrees (assuming that the player is of normal body proportions).
We cannot really establish a norm for this. In general, we can say that the shorter the player’s forearm, the more their entire arm has to stretch when fully extended. If the limbs are short and stocky, even fully extending the arm may not achieve what a person with long arms can do. With short, stocky limbs, this bow position may not be achievable even when the arm is fully extended, and this can cause the tip of the bow to point downward. The tip of the bow can be used to greatest effect when it is moved slightly beyond the point where it would naturally stop. This means that the player might even have to pull the shoulders forward a little to make it work. Sometimes the nature and structure of the instrument are more essential than strict adherence to methodical instructions. Of course, we always have to make compromises, but should never regard a deviation from the norm—even if it is done by an excellent musician—as a key to success. There are some very gifted individuals who achieve outstanding results even with technical deficiencies and hindrances. Too often, flawed logic leads people to think these imperfections are something to imitate!
If the string is bowed at a wrong angle, or if the movements are inadequate, pressure will be applied in the wrong places and the sound will inevitably suffer. When technical problems arise, the solution is sometimes to make physiological adjustments without abandoning methodical principles. A method provides a norm, but cannot account for every conceivable issues, such as innate clumsiness in certain tasks,[1] a poor-quality instrument, the strings, weather conditions (for example, humid weather can cause the strings to respond poorly, necessitating a very subtle approach to tone), and so on.
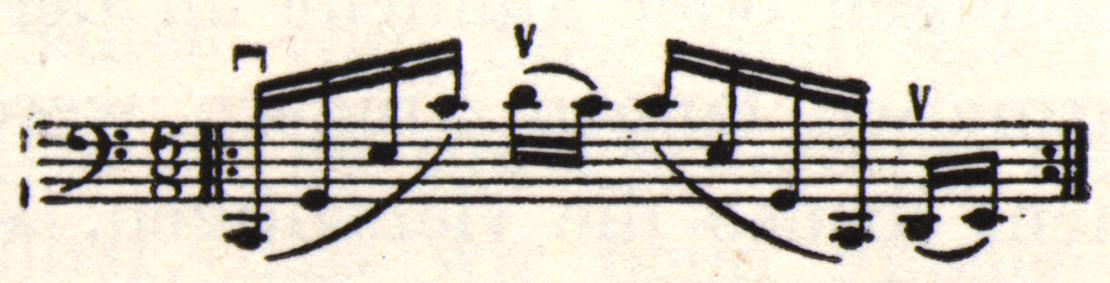
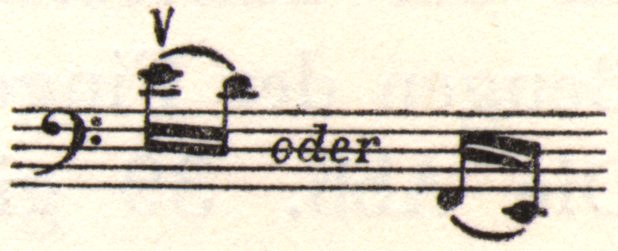
Just as in the previous instructions, when we play the above figure we can play both up-bow strokes in the same hand position, using a slight movement of the fingers. On the C-string, the fingers will move in the manner of a hinge joint (i.e. flexion and extension). On the A-string, movement in the plane of the bowstroke is only possible if we utilize the last bit of finger mobility—that is, their sideways movement. We can even perform a small lateral movement of the fingers without moving the metacarpal (test this without the bow!), as long as the base joints are extended towards the hand. (See [Steinhausen’s]The Physiology of Bowing.)
As the knuckle joints of the fingers curl more toward the palm, this sideways mobility becomes increasingly limited. With fingers bent at right angles to the hand, absolutely no sideways movement exists anymore (this is simply how the hand’s knuckle joints are anatomically constructed). This finger mobility with the bow thus provides approximately 2-4 cm of bow movement, which is sufficient for executing this figure:
In other musical passages, we will use this sideways finger movement combined with wrist rotation. My goal in explaining all these movements has been to help the reader understand how the hand and finger mechanism works, and to demonstrate the crucial role that these small finger and hand movements play in mastering bow technique.
In any given piece, whether from a concerto, a sonata, or chamber music, there will be passages whose perfect performance at the correct tempo (from both musical-aesthetic and cello-virtuoso viewpoints) cannot be accomplished in any other way than the simplest and most practical.
Admittedly, it may seem quite complicated at first to have to combine the motions of multiple finger joints, wrist movement, and forearm rotation. However, once the learner becomes more familiar with this way of using the arms in cello playing, it will seem just as useful and indispensable as the manual movements they use in any other everyday activity. (For example, we use similar movement mechanisms when tying a bow, buttoning a coat, and so on.)
What elevates instrumental playing above all other uses of the body (and creates the necessary conditions for artistic treatment of the instrument) is the combination of individual procedures into large, sweeping movements of the arm, and the measurement of forces during sustained regulation of bow pressure. The latter phenomenon is evident even in the simplest bowstroke. In order for the tone to sound evenly throughout the entire up-bow and down-bow strokes, unequal application of force on the bow is necessary.
An example from the literature that demonstrates the need to combine auxiliary movements with arm trajectory can be found in the Prelude from Bach’s First Cello Suite, measure 1. The first down-bow here also demonstrates how to apply “reservation.” The basis of the movement is the bowing plane of the D-string, since within one down-bow stroke, we must play the G-, D-, and A-strings. (See image 36 of the Appendix for the normal starting position.) During the course of the down-bow, which swiftly moves the bow to the middle on the G-string, the hand assumes a reserved position on the bow. Now, the second sixteenth note (D) is played by extending the fingers at the base joints and flexing them at the end joints, while simultaneously slightly raising the back of the hand, as shown in image 37. A further movement of the hand and fingers brings the bow to the A-string (see image 38). The second group of sixteenth notes (on the second quarter beat of the measure) is likely to be played at the very tip of the bow. We can get back to the D-string by bending the fingers while simultaneously slightly lowering the hand. Image 39 shows a phase of the backward movement on the D-string. Image 40 shows the hand position at the end of the first measure, when the bow has returned to the frog.
We will now illustrate the visible movement process that occurs during a simple full bowstroke.
Details in Figures
In images 41, 42, 43, 44, and 45 of the Appendix, we can clearly see the direction of the down-bow. No one familiar with movement processes would recognize these images in any other way than as the different phases of a “pulling” movement (i.e. the down-bow stroke). By the same token, images 46, 47, 48, 49, and 50 can only be the different phases of a “pushing” movement (i.e. the up-bow stroke). We could interpret image 51 either as the conclusion of the up-bow (where the bow appears to be drawn beyond the string, in continuation of a pronounced grip change) or as the beginning of a three-note chord on a down-bow stroke.
The section on positioning the cello provides a good demonstration of what the arm and hand do during bowing. The shoulder and upper arm create the impulse, and carry the hand along with them, but the smooth, steady bow stroke is created by the reactive hand and fingers, which alone provide the fluid motion and allow the upper arm’s power to flow unobstructed to the string. The different hand positions shown in the pictures do not represent phases of an active wrist movement, but rather show different moments of a uniformly executed movement process that is carried out by the upper arm and shoulder, and in which the hand on the bow only reflects the reactive effects of the movement. If force expenditure remains minimal, the process concurs with Steinhausen’s criteria: the upper arm is the force-giver, the forearm is the force-conductor, and the hand takes over the function of transmitting the arm forces to the bow. However, Steinhausen did not know the concept of reactivity. The hand and fingers cannot remain in a rigid shape, but must react to the movement impulse by smoothly guiding the bow through the fingers. This allows the sequence of movements to reach its conclusion without impediment. As soon as we have to apply greater pressure (i.e. to play forte), a different arrangement is necessary, as Steinhausen discusses in his book on the physiology of bowing.
- Becker's note: "For example, some people find it difficult to combine forearm rotation with finger movement." ↵
