
The Full Bow Stroke
We begin our discussion of specific bow techniques with the stroke that can be considered fundamental from both educational and physiological perspectives – the so-called full bow stroke. This is the longest possible stroke, running smoothly over the entire length of the bow in both up-bow and down-bow directions.[1] This type of stroke encompasses both the sustained tone (son filé) and the broad détaché (le grand détaché).
What characterizes this stroke is the continuous application of force to the bow throughout the entire duration of the stroke. With the exception of the moderate acceleration that occurs at the beginning and end (done by stretching and bending the fingers to achieve inaudible bow changes), the bow operates under uniform and consistent muscular pull and pressure.
Any jerking movements of the arm or hand should be avoided if possible! It is particularly difficult for beginners to achieve uniform muscular action, because several different movement-related factors go into what looks like a single bowing movement. Therefore, the most careful attention to dynamic muscle coordination is required, and this demands observing the law of minimal energy expenditure.
Increases and decreases in bow speed can be alternately paired with a change in pressure, which acts in the same or opposite direction.
By adjusting our playing apparatus to the proper physiological position, we have the tools needed for tone production at our free and conscious disposal. Let us begin with a down-bow on the D-string at the “starting position” shown at image 10 of the Appendix.
Now, let us imagine that we are giving further instructions to an untrained but naturally musical student. We will ask them to set the bow in motion through a slight activity of the pronating forearm, with the fingers in contact with the playing axis!
While the upper arm first provides moderate abduction to continue the bow’s movement, the forearm creates the pressure from pronation that we need for tone production, due to its tendency to rotate inward (see image 11 of the Appendix). Here the elbow moves somewhat sideways and backward in a curve. It’s very important to note that this curve should lie in a horizontal plane as much as possible!
To get a better sense of this, the student should imagine that the elbow must remain in the plane (parallel to the ground) that was initially established in the starting position. Even though this isn’t a mathematically exact concept, this mental image still helps create an effective use of our physical resources.
If the elbow were to rise into the air instead of staying in this plane, the physiological disadvantage described in the previous section would arise. That is, that through exaggerated pronation, the hand and forearm would move too far away from the middle position. To relieve the resulting pressure on the string, the entire movement apparatus would have to be constantly slightly elevated from the shoulder.
This would create a much more complicated movement process instead of the relatively simple one. Its tendency would run contrary to the fundamental physiological principle that the simplest available movement process is the best for tone production.[2] From a certain point on the bow’s path—whose position varies somewhat according to the player’s body proportions—the elbow movement stops between the middle and upper third of the bow. The continuation of bowing towards the tip happens through extending the arm to its full length, whereby the forearm slightly increases its angle relative to the upper arm at the elbow joint (see image 12 of the Appendix).
So that the forearm can maintain the effect of its force while moving toward the tip, the elbow must be kept in a specific middle position (see image 13 of the Appendix). It should not be too high, since this would put too much strain on the upper arm parts, nor too low, since the latter would impair the pronating component of the movement and weaken the stroke toward the tip, reducing the vibration of the string.
We emphasized earlier that proper bow technique always involves several types of movement simultaneously. Every simple, natural movement involves multiple joints and muscle groups. Executing a complex movement (assuming it goes correctly and is aesthetically pleasing) requires the sequence of movements to flow from the center to the periphery in the right timing. We can probably execute partial bow movements (e.g. crossing from one string to another) through a single simple contraction of the finger or wrist joints. But to carry out sufficient movement processes for the entire arm, we need the right combination of push and pull.
This unifies all the motor functions of arm, middle hand, and fingers into a single, lively movement process whose main characteristic, from a physiological standpoint, is momentum.
Momentum enables the highest technical fluency as well as the greatest tone (and the capacity for its modulation). Yes, skillful right-arm technique can partly take over the function of the left hand’s vibrato by creating all the finer nuances and vibrations of sound through appropriate use of pressure gradation (i.e. changes in speed, or changes to the choice of sounding point). These are all factors that contribute to sound intensity and shaping.
We must remember that all physical and physiological factors are mutually interdependent. This determines the bow pressure needed to produce the same volume from middle to tip, or to produce a crescendo. The stronger exertion and pressure require faster bow movement to ensure that the tone remains free from harshness despite the greater volume. There can be no fixed formulas for the most intimate processes of bow control, only hints about how the individual factors can have an effect. Plus, analytical experiments make it possible to develop individual bow movements though specialized exercises!
We must approach this understanding with our everyday practice routines in mind. Unfortunately, it an undeniable fact that effortless, aesthetically flawless bow control—one that never loses its appeal for our audience—can only be achieved efficiently when we pay conscious, focused attention to every detail of bowing technique from the very beginning. One can practice intelligently and consciously while remaining internally relaxed; as opposed to to blind, mechanical, and unintelligent practice that will only result in slow progress. The former leads to mastery of the instrument and thus to musical maturity through slow, secure progress; the latter, via cramped muscles, overworked joints, and damaged tendons, leads at best to empty virtuosity.[3] This brings us to discussing individual aspects of complete bow technique.
Based on theoretical considerations and practical experience, we embrace the principle of so-called loose, relaxed[4] bowing.
The starting point for our teaching method is not a rigid, tense bow grip, but rather the loose grip that allows the bow freedom of movement even in the fastest tempos. Let the pursuit of perfection guide your thought process in practice. The thumb should be positioned correctly and held firmly, because it serves as the stable base that supports all the natural movements required for playing. Even the oddest teaching methods can work well for certain specific details of technique. To achieve the highest levels of both technical skill and artistic expression, however, one needs to approach things from a broader, more holistic perspective.
An unrelentingly firm bow grip is associated with excessive wrist movement, which is particularly unfavorable at the frog (see the relevant section on the détaché stroke). Similarly, it inhibits the natural momentum which is too valuable a factor in bowing to sacrifice for the sake of a rigid principle.[5]
The relaxed bow grip has two particularly important consequences. First, it allows the use of the so-called “unit” (see the section on the bow grip) at all levels of tone intensity. In this way, we can produce string crossings, articulations at the beginnings of notes, position shifts, and off-the-string bowstrokes solely through finger and wrist movement without changing the primary bowing direction of the arm.
Secondly, it allows the strength of the arm to affect the bow in a particularly favorable manner, allowing the up- and down-bow strokes to be dynamically varied. During the up-bow, we move our center of force against the resistance, i.e. the sounding point between bow and string, much like pushing a cart. During the down-bow, the center of force moves away from the point of stress, like pulling on a string.
The change in our hand position at the transition between up- and down-bows is called the “grip change.”
The Grip Change
Transitioning from up-bow to down-bow as smoothly and imperceptibly as possible is a particularly difficult aspect of bowing. There is a common misconception that you need to move the bow itself in curved paths at the frog and tip to achieve this smoothness. In reality, the situation is different: the bow should generally travel in straight lines across the strings, while your hand makes the necessary curved movements to control it. We need to distinguish between the path that any point on the bow itself takes versus the path that your bow hand takes. To understand this movement clearly, we can track reference points like the frog, the knuckles, and the wrist. We also need to separate the movement trajectories used for long strokes on a single string from those used when crossing between multiple strings. For single-string playing, the bow moves in approximately straight lines, while string crossings require various curved hand movements to guide the bow smoothly.
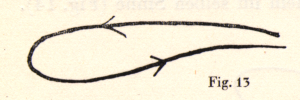
The movement diagram of the bow usually does not run parallel to that of the hand. This is particularly evident when comparing the bow changes at the frog and at the tip during individual strokes. At the frog, no movement curves of the bow arise, whereas the function of the grip change causes such curves of the hand. What emerges from Figs. 12 and 13 is substantially different. At the tip, however, a movement curve of the bow occurs to some extent. This will be presented in more detail in due course. All “rotations” of the bow that manifest in curves, whether during bowstrokes on just one string or during string crossings, can only happen in the so-called “bow rotation plane.”
By bow rotation plane, we mean the plane located through the stick of the bow and the bow-hair, which is approximately perpendicular to the string. The angle between the bow rotation plane and the string amounts to 90 degrees, when playing on all the hair; it becomes smaller if you tilt the bow. The “playing plane,” on the other hand, refers to the plane created by the bow hair, parallel to the string, which in turn is approximately perpendicular to the plane of bow rotation.[6]
At the endpoints of the straight trajectory of the bow, the velocity is zero. This is where the direction of the up-bow stroke changes to that of the down-bow stroke, and vice versa. If the time of “standstill” is reduced to a minimum and the pressure on the string sufficiently diminished, then we achieve a good acoustic effect. Unfortunately, our arm cannot precisely stop the bow for an instant, reduce the pressure, and transition from one movement direction to another with perfect precision. The difficulty is particularly noticeable in the martelé stroke, which should be performed at great speed with the entire bow! The movements of the bow hand are different, depending on whether the bow change takes place at the tip or at the frog. At the tip, we guide the bow in a curve, as indicated in Fig. 11.
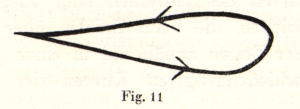
Only hand and fingers should participate in this curving trajectory. At the frog, we should avoid deviating from a straight line in the bow’s trajectory, since any lateral movement in the bow rotation plane would cause dynamic fluctuation. The moment of reversal from up-bow to down-bow should not be acoustically perceptible. However, since a momentary standstill of the entire arm movement requires greater expenditure of force, particularly of the upper arm muscles, we must use the hand as an elastic “intermediary” between the movements of the arm and the bow.
At the moment when the bow reverses direction, we guide the hand in a curved motion to transition smoothly through the “standstill” (we do not adjust the bow rotation plane).
Changes in bow direction at the frog are more difficult than those at the tip. At the frog, we must balance multiple competing forces—the bow acts like a see-saw with forces pulling in opposite directions on either side, while our hand provides counterbalancing weight. At the tip, however, the controlling force comes mainly from pronation of the index finger, which works like a simple lever system.
To execute the grip change at the frog, the hand and fingers guide the bow to completion from a specific point near the frog on the up-bow stroke. Meanwhile, the forearm is already preparing for the down-bow movement. (See the illustration in the section on individual demonstration of auxiliary movements.)
During a brief time-frame, while the hand is on its way to completing the up-bow stroke, the forearm is already moving in the direction of the down-bow. In this way, the hand movement is overtaken by the movement of the forearm through a kind of advance preparation for the change in bow direction. To make this happen, the wrist must flex a little during the up-bow stroke, then extend fully as the forearm changes direction, allowing the final part of the up-bow to be completed by the fingers.
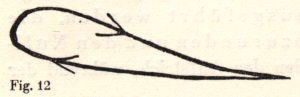
Fig. 12 shows the projection of a point on the connecting line of the knuckles onto a plane imagined vertically in front of the player. The down-bow stroke immediately follows this grip change. The sequence of movements in this process is such that the forearm, hand, and fingers, along with all involved joints, participate seamlessly in their proper order. This visual control is supplemented by auditory control, i.e. by letting our ear be the judge. According to the principle that perfect playing movement leads to perfect tone production, the grip change should be pronounced, but not exaggerated, in order to connect strokes in a perfectly beautiful sequence of notes.
Since the wrist inevitably sinks somewhat during the down-bow stroke, it must be raised again at the beginning of the up-bow movement (a pulling movement!) to enable simultaneous pronation. The latter is especially necessary when playing at greater volume.
Fig. 13 depicts the curves of the wrist. Compare it with Fig. 12 to get an idea of the overall movement in space. To achieve a smooth grip change, the wrist must rise during the up-stroke, as already mentioned, but not so high that the tip of the bow is pushed downward at the last moment, impairing the vibration of the string.
Then, a certain momentum in bowing is necessary, because with very slow bow movement, the grip change gradually decreases. However, it should never be completely absent, otherwise the fingers would have to perform a very active movement, resulting in an audible jolt. We thus come to explain the important concept of “reactivity.”
During grip changes, the movement of the fingers and hand is not entirely active, but also not entirely passive. Rather, they are in a state where the bow has a certain velocity and maintains a certain momentum through the arm’s movement, which propels it forward. The hand and fingers follow this path, and only when reaching the moment of reversal (when the arm is already preparing for the down-bow) do they become more active in terms of pressure and movement. This condition of following and yielding within the larger arm movement is called reactivity. (See Jahn’s Fundamentals of Natural Bowing.) Only when the bow is grasped loosely, and never with a rigid grip, can the momentum of the bow continue to the natural end of its trajectory.
Naturally, the fingers must not be stretched out in advance; they need to perform their movement at the moment when the forearm has come to a stop and the wrist is raised. The lowering of the back of the hand, stretching out of the fingers, and beginning of the backward movement of the forearm follow immediately, one after the other. This makes it possible, for a short time, for the two opposing movements of bowing to be executed. This serves the purpose of rounding off the bowstroke and seamlessly changing bow direction. The fingers and hand complete the up-bow stroke while the forearm is already beginning the down-bow.
The grip change at the end of the up-bow stroke also has general application in strokes that do not bring the bow all the way to the frog. In this way, we can use it when playing spiccato as well as détaché. We can almost say “No bowstroke without a grip change!”
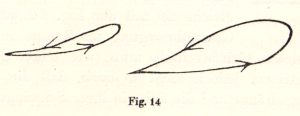
The grip change at the tip presents fewer difficulties, as mentioned earlier. Here the bow movement is guided around the change in direction through slightly raising the hand and simultaneously lowering the wrist, as well as extending the fingers. In contrast to the grip change at the frog, here the curves of wrist and knuckles run in the same direction (Fig. 14).
The bow change must not, of course, disturb the straight path of the bow’s trajectory at any point. On the contrary, it should establish it where otherwise (due to incorrect, exaggerated use of the wrist) the bow could be deflected away from its perpendicular placement on the string. We must point out repeatedly that most mechanical actions involving the hand and fingers are executed on the bow, not with the bow. The bow should be perpendicular to the string in every phase of the stroke; it should not be tilted unless for very specific intended effects such as sotto voce, flautando, or sul ponticello.
Note that deviations from the straight bow trajectory (i.e. in the playing plane) can be corrected using the simplest means. We can compensate for a sinking of the tip downward by pulling (bending) the index finger. We can also correct an excessive upward movement of the tip by reducing the bending of the index finger, or through a slight action of the little finger (increasing or reducing the pressure). A change in the playing plane (i.e. a string crossing) at the frog should never be done with an arm movement, but rather through a quick double-lever movement of the fingers.
- Becker's note: "The terms 'down-bow' and 'up-bow' are completely incorrect—indeed, absurd—in cello playing; they were thoughtlessly borrowed from violin technique, where they are justified due to the horizontal position of the violin. Due to the left-leaning position of the instrument (at least on the C and G strings), the so-called 'up-bow' is executed in an upward direction—not downward. As Steinhausen already mentioned in his Physiology of Bowing, the terminology chosen by the French—tirer [pull] for down-bow and pousser [push] for up-bow—meets all didactic requirements, making clear language possible. Introducing the terms 'pull stroke' and 'push stroke' ensures absolute clarity and uniformity in the following explanations. Perhaps a later generation will decide to introduce the term 'pulling and pushing' and, for the sake of absolute clarity and uniformity, use exclusively the following symbols: Π pull stroke, V push stroke (not ∐ or ∧!). Therefore, the cellist would do well to be guided, with regard to the arm, hand, and finger position during the up-bow, by the idea that the arm, in a sense, 'pushes' the hand, and this, in turn, pushes the bow forward. However, the hand should not follow the arm and bow. Only to facilitate the change of fingering does the wrist take over for a moment, just for the transition; otherwise, the arm leads, and the fingers transmit the movement." ↵
- Becker's note: "Of course, we cannot consider the movement perception of an ungifted person as a criterion for simplicity, because such a person understands 'simple' and 'natural' as the familiar everyday movements, which are often entirely unsuitable for artistic practice. Much is said about natural bow technique without realizing that contradictory exercises are perceived and practiced as foreign. If we start from this basic principle, only very few, motorically talented people could reach a high artistic level by being left to their usual way of movement." ↵
- Becker's note: "We must evaluate those impediments to playing in the same way that medical doctors evaluate pain and fever. Premature fatigue and pain in any part of the body, which are completely harmless if treated promptly, are a warning that something is wrong." ↵
- Becker's note: "The term 'relaxed' refers, of course, to the muscles of the arm and hand, not to the hair of the bow." ↵
- Becker's note: "On combining lightness and power in bow control: one of the greatest difficulties in the art of bowing is combining an elastic bow grip with a certain firmness in the bow control. As is well known, the two approaches to 'tight or loose grip' are diametrically opposed. As far as the cello is concerned, certain tasks in the repertoire cannot be performed perfectly without an elastic, i.e., loose, bow grip (e.g., in the Dvořák Concerto, last movement, p. 31, second system, third and fourth bars). [Becker refers to the piano score of the 1896 edition by Simrock.] However, if we were to accept as proven the claim of the opponents of the loose grip, that a powerful tone is only possible with a firm bow grip, the proponent of the loose grip would be perfectly capable of holding the bow more tightly when playing forte, if this should be necessary at times. Conversely, someone unfamiliar with the loose grip would be in no way able to suddenly adjust on a whim and use it for rapid figures that require lightness and grace. This clearly shows that the greater advantages are to be found in the elastic bow grip." ↵
- Becker's concept of the "bow rotation plane" (Bogendrehebene) is an up-and-down rolling of the bow that enables playing on the flat or the side of the hair. "Playing plane" (Spielebene) is the side-to-side plane between bow and string in the context of bowing trajectory. A string crossing necessitates a change in the playing plane. ↵
